Installing kubernetes and databases on VMs with ansible
Introduction
In a production environment, some parts of the wire-server infrastructure (such as e.g. Cassandra, PostgresSQL, RabbitMQ, Minio etc databases) are best configured outside kubernetes. Additionally, kubernetes can be rapidly set up with kubespray, via ansible. This section covers installing k8s services and databases with ansible.
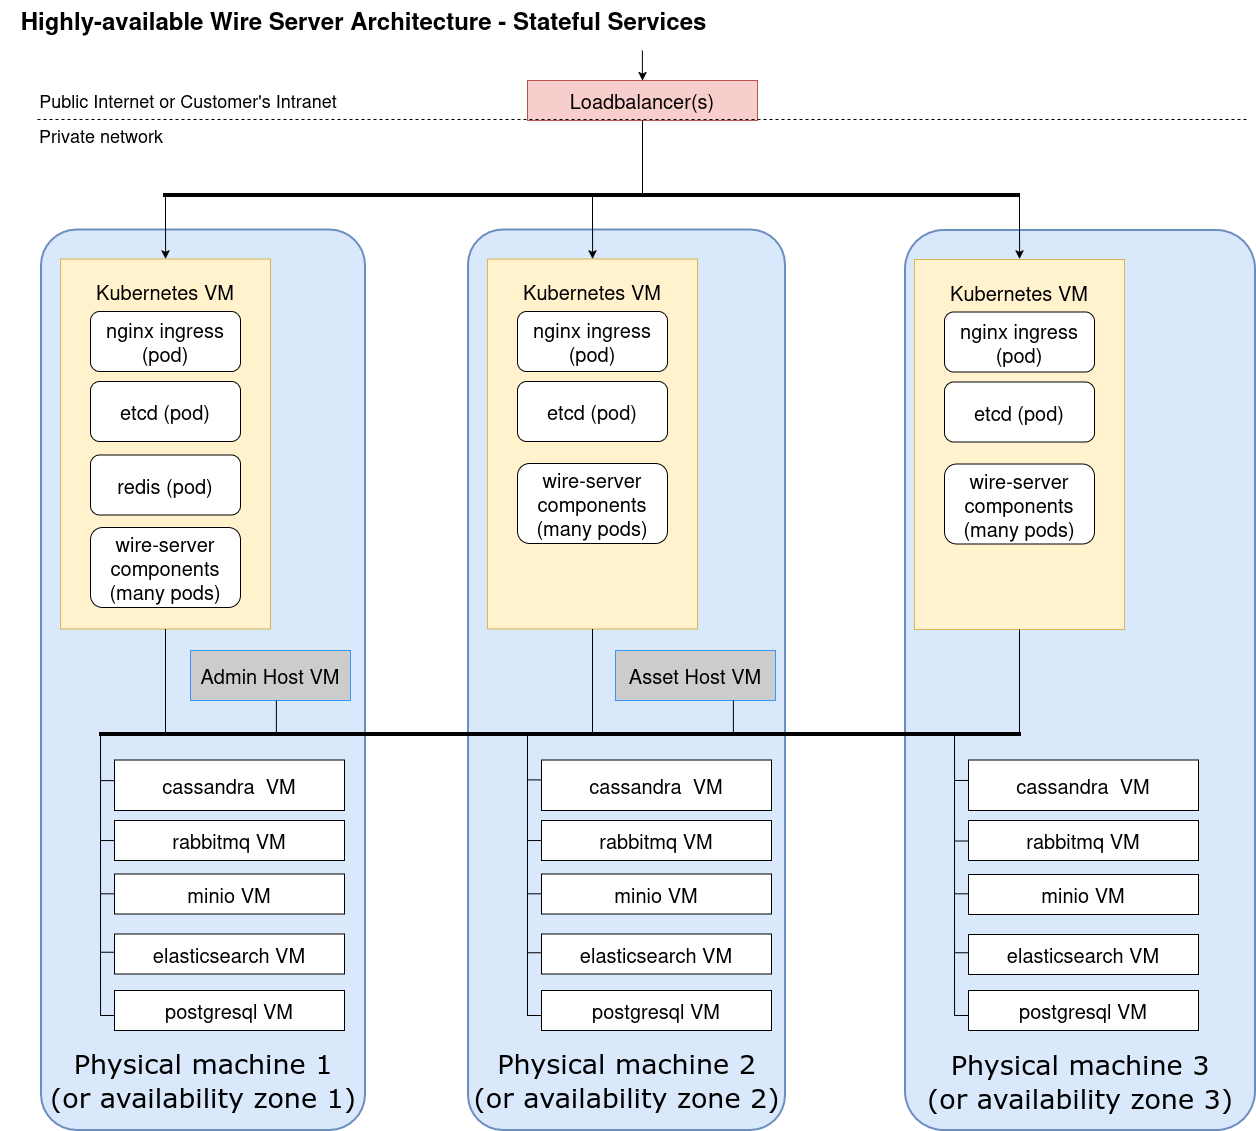
Please ensure that we have created VMs as per the production architecture, we would be using this information in the next step of creating inventory.
Downloading and extracting the artifact
Create a fresh workspace to download the artifacts:
Extract the above listed artifacts into your workspace:
<HASH> above is the hash of your deployment artifact, given to you by Wire, or acquired by looking at the above build job. Extract this tarball. Make sure that the admin host can ssh into all the machines that you want to provision. Our Making tooling available in your environment will use the .ssh folder and the ssh-agent of the user running the scripts.
There's also a docker image containing the tooling inside this repo.
Editing the inventory
Copy ansible/inventory/offline/99-static to ansible/inventory/offline/hosts.ini, and backup the original.
Edit ansible/inventory/offline/hosts.ini. Here, you will describe the topology of your offline deploy as explained in the next section.
Add one entry in the all section of this file for each machine you are managing via ansible. This will be all of the machines in your Wire cluster.
If you are using username/password to log into and sudo up, in the all:vars section, add:
Note: Make sure that
assethostis present in the inventory file with the correctansible_host(andipvalues if required)
SSH authentication options:
- If the VMs are reachable with a private key, set
ansible_ssh_private_key_filein the inventory and run Ansible normally. - If you rely on an SSH agent, keep
ansible_ssh_private_key_filecommented out and ensure the agent on theadminhostcan reach all VMs. - If you do not use a private key entry in the inventory and password authentication is enabled on the VMs, add
--ask-passwhen running ansible-playbooks manually and--ask-become-passfor sudo access. - Our installation scripts are non-interactive, define
ansible_passwordandansible_become_passin the inventory instead of relying on interactive password prompts.
Before running the offline deployment scripts, verify that the inventory resolves to the expected machines. The commands below assume you are running them from /home/ansible_user/wire-server-deploy on the adminhost.
Updating Database Group Memberships
It's recommended to update the lists of what nodes belong to which group, so ansible knows what to install on these nodes.
These sections are divided into individual host groups, reflecting the architecture of the target infrastructure. Examples with individual nodes for Elastic, MinIO, PostgreSQL, RabbitMQ and Cassandra are commented out below.
Configuring kubernetes and etcd
To run Kubernetes, at least three nodes are required, which need to be added to the [kube-master], [etcd] and [kube-node] groups of the inventory file. Any additional nodes should only be added to the [kube-node] group, for example:
Setting up databases and kubernetes to talk over the correct (private) interface
If you are deploying wire on servers that are expected to use one interface to talk to the public, and a separate interface to talk amongst themselves, you will need to add "ip=" declarations for the private interface of each node. for instance, if the first kubenode was expected to talk to the world on 192.168.122.21, but speak to other wire services (kubernetes, databases, etc) on 192.168.0.2, you should edit its entry like the following:
Setting up Database network interfaces and service specific variables:
- Make sure that
cassandra_network_interfaceis set to the name of the network interface on which the kubenodes should talk to cassandra and on which the cassandra nodes should communicate among each other. Runip addron one of the cassandra nodes to determine the network interface names, and which networks they correspond to. In Ubuntu 22.04 for example, interface names are predictable and individualized, eg.enp41s0. - Similarly
elasticsearch_network_interface,rabbitmq_network_interface,postgresql_network_interfaceandminio_network_interfaceshould be set to the network interface names to the service specific groups to ensure communicatation with kubernetes and among each other. - RabbitMQ requires the variable
rabbitmq_cluster_masterto configure one of thermq-clusternodes as master, the value should be thehostnamefor master node. - PostgreSQL requires following variables to define the database topology and database to create. These has been pre-filled with default values - modify them as per your environment.
- In an INI inventory, the
repmgr_node_configkeys must match the PostgreSQL inventory hostnames. - To read more about configurations related to each data service read at:
Example hosts.ini
Here is an example hosts.ini file for the primary k8s cluster and database services.
More checks on Inventory
Note: If your environment uses a non-standard MTU (e.g. cloud providers, VPNs, or overlay networks), you must configure the MTU for Calico in
k8s-cluster.vars. Ensure all VMs have the same MTU on their primary interface:Then set: As a rule of thumb:
-calico_mtu = underlying network MTU - encapsulation overhead
-calico_veth_mtu≤calico_mtu
Using following commands we can verify if our inventory is functional:
If any hostname, IP address, SSH setting, or interface name is wrong at this stage, correct ansible/inventory/offline/inventory.yml before continuing. The next deployment steps assume this inventory is accurate.
Generating secrets for the services
Minio and coturn services have shared secrets with the wire-server helm chart. Run the folllowing script that generates a fresh set of secrets for these components:
This should generate 3 secret files as:
ansible/inventory/group_vars/all/secrets.yaml- This file will be used by ansible minio playbooks to configure the service secrets.values/wire-server/prod-secrets.example.yaml- This contains the secrets for Wire services and share some secrets from coturn and database services.values/coturn/prod-secrets.example.yaml- This contains a secret for the coturn service.values/kube-prometheus-stack/prod-secrets.example.yaml- This contains secret for Prometheus in kube-prometheus-stack. Only applicable when deploying thekube-prometheus-stackhelm chart withauthenabled for prometheus.
Deploying Kubernetes and stateful services
In order to deploy all mentioned services, run:
This wrapper runs the following Ansible playbooks in order:
d ansible-playbook -i ansible/inventory/offline/hosts.ini ansible/setup-offline-sources.yml- prepares the
assethost, copies offline artifacts, and configures the other hosts to fetch packages and images from it.
- prepares the
d ansible-playbook -i ansible/inventory/offline/hosts.ini ansible/kubernetes.yml --tags bastion,bootstrap-os,preinstall,container-engine- runs the first Kubernetes bootstrap phase so the container runtime is ready. Can be used for calling kubernetes cluster.
d ansible-playbook -i ansible/inventory/offline/hosts.ini ansible/seed-offline-containerd.yml- loads the offline container images onto the nodes after the runtime is available. Can be used for calling kubernetes cluster for coturn and sft images.
d ansible-playbook -i ansible/inventory/offline/hosts.ini ansible/sync_time.yml- installs and configures time synchronization before the rest of the cluster comes up.
d ansible-playbook -i ansible/inventory/offline/hosts.ini ansible/kubernetes.yml --skip-tags bootstrap-os,preinstall,container-engine,multus- finishes the remaining Kubernetes deployment after the prerequisites are in place. Can be used for calling kubernetes cluster.
d ansible-playbook -i ansible/inventory/offline/hosts.ini ansible/cassandra.yml- deploys the Cassandra nodes.
d ansible-playbook -i ansible/inventory/offline/hosts.ini ansible/elasticsearch.yml- deploys Elasticsearch.
d ansible-playbook -i ansible/inventory/offline/hosts.ini ansible/minio.yml- deploys MinIO.
d ansible-playbook -i ansible/inventory/offline/hosts.ini ansible/postgresql-deploy.yml- deploys the PostgreSQL cluster.
d ansible-playbook -i ansible/inventory/offline/hosts.ini ansible/roles/rabbitmq-cluster/tasks/configure_dns.yml- prepares DNS entries required by the RabbitMQ cluster.
d ansible-playbook -i ansible/inventory/offline/hosts.ini ansible/rabbitmq.yml- deploys RabbitMQ.
d ansible-playbook -i ansible/inventory/offline/hosts.ini ansible/helm_external.yml- writes the external service IPs into the Helm values files so the charts can target those services. This step is a pre-requiste before continuing with helm operations.
The order matters - offline package sources and container runtime must be ready before image seeding, time sync should happen before the cluster stabilizes, Kubernetes must exist before the rest of the platform is wired around it, and helm_external.yml comes last because it depends on the database and messaging nodes already being deployed.
If one step fails and you want to run the playbooks manually, use the d alias shown above and execute the specific command directly in the same order.
Ensuring Kubernetes is healthy.
Ensure the k8s cluster comes up healthy. The container also contains kubectl, so check the node status:
Troubleshooting external services
Cassandra, Minio, PostgresSQL, RabbitMQ and Elasticsearch are running outside Kubernets cluster, make sure those machines have necessary ports open -
On each of the machines running Cassandra, Minio, PostgresSQL, RabbitMQ and Elasticsearch, run the following commands to open the necessary ports, if necessary (Verify if ports are open by default):
Deploying secondary k8s cluster for calling services
Now we are done with configuring primary k8s cluster and databases. Now, we would be installing a secondary k8s cluster.
Marking kubenodes for calling servers (SFT/Coturn)
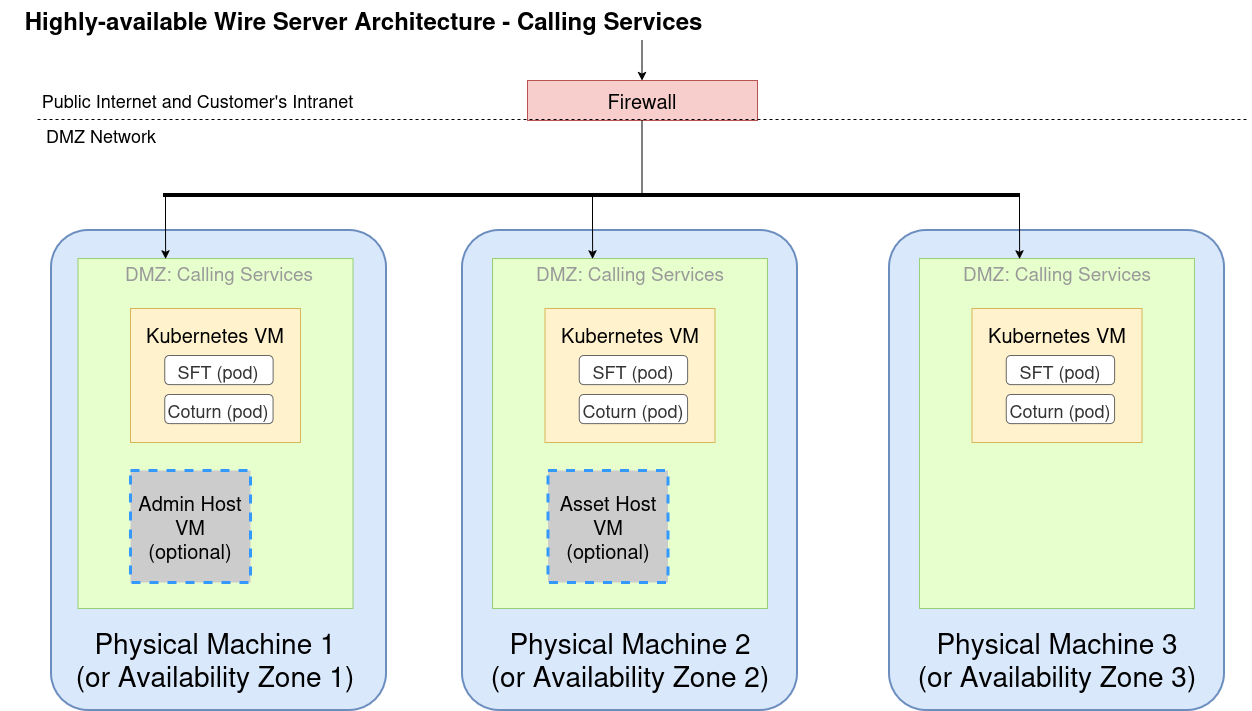
The SFT & Coturn Calling server should be running on a kubernetes nodes that are connected to the network where they are reachable to your clients. If client network is undefined and clients connect from all over public Internet, then these nodes should be connected to public network. If not all kubernetes nodes match the network criteria, you should specifically labels on nodes that match these criteria and similary nodeSelector criteria for SFT helm chart, so that you're sure SFT is deployed correctly.
By using a node_label you can make sure SFT & Coturn are only deployed on certain nodes like call_kubenode1 & call_kubenode2:
If the node is not bound to the public IP the users will see(e.g. becuase it's behind NAT) then you should also set the wire.com/external-ip annotation to the public IP of the node.
Install a calling kubernetes using the playbooks from above and then continue with installation of coturn and sftd helm charts.
Post Installation checks
After running the above playbooks, it is important to ensure that everything is setup correctly. Please have a look at the post install checks in the section Verifying your installation
Before installing helm charts
The helm_external.yml playbook is used to write or update the IPs of the databases servers in the values/<database>-external/values.yaml files, and thus make them available for helm and the <database>-external charts (e.g. cassandra-external, elasticsearch-external, minio-external, postgresql-external etc).
Due to limitations in the playbook, make sure that you have defined the network interfaces for each of the database services in your hosts.ini, even if they are running on the same interface that you connect to via SSH.
Note: If you have already ran the script /bin/offline-cluster.sh then this playbook might have already been ran for you. You can confirm this by looking into the database specific helm values, if they have entries for each database service:
values/cassandra-external/values.yamlvalues/elasticsearch-external/values.yamlvalues/minio-external/values.yamlvalues/postgresql-external/values.yamlvalues/rabbitmq-external/values.yaml
Now run the helm_external.yml playbook, to populate network values for helm:
Next steps for high-available production installation
Your next step will be Installing wire-server (production) components using Helm