WIAB Staging Deployment Guide
Introduction
Wire in a Box (WIAB) Staging is an installation of Wire running on a single physical machine using KVM-based virtual machines. This setup replicates the multi-node production Wire architecture in a consolidated environment suitable for testing, evaluation, and learning about Wire's infrastructure—but not for production use. The main use of this package is to verify that automation inside and outside of the wire product functions in the fashion you expect, before you run said automation in production. This will not test your network environment, load based behaviors, or the interface between wire and it's callingservices when using a DMZ'd network configuration.
Important: This is a sandbox environment. Data from a staging installation cannot be migrated to production. WIAB Staging is designed for experimentation, validation, and understanding Wire's deployment model.
For a high-level comparison of WIAB Dev, WIAB Staging, and Production, see the planning overview (in particular, Artifact bundle and offline deployment).
Architecture overview
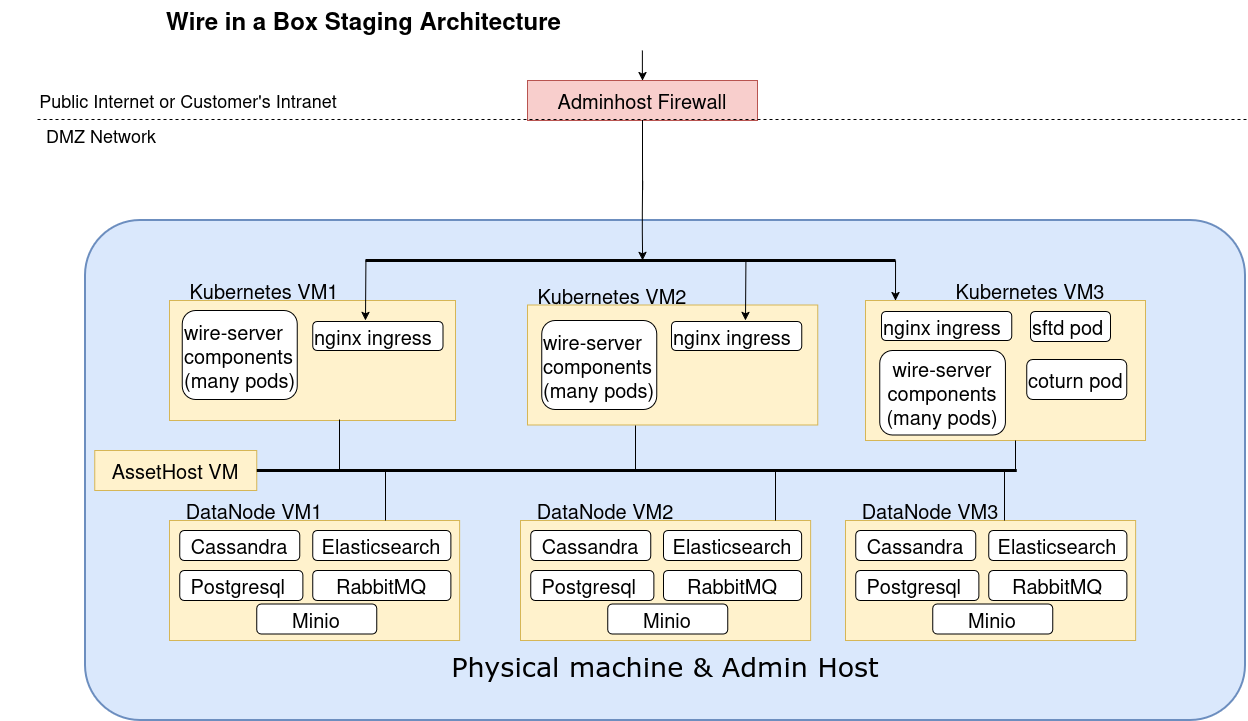
Relation to production
WIAB Staging is designed to be structurally similar to a production deployment:
- Separate nodes for Kubernetes and stateful services.
- Use of offline artifacts, Ansible, and Helm for installation similar to production workflows.
- Able to test upgrade proceedures for production.
Key differences from production:
- All VMs run on a single physical host (single failure domain).
- Resource sizing is optimized for staging, not for peak production traffic.
- Calling services run with limited resources (replicas=1).
- Calling services will share the same k8s cluster as Wire stateful services hence, all infrastructure will be DMZ (De-militarized zone).
If you need a fully supported, highly-available, secure, multi-datacenter deployment, use the Production path instead (see ansible-VMs.md and helm-prod.md).
Requirements
- One physical machine with hypervisor support (KVM):
- Memory: 55 GiB RAM
- Compute: 29 vCPUs (At least processor 6 cores)
- Storage: 850 GB disk space (thin-provisioned)
- 7 VMs with Ubuntu 22 as per (#VM-Provisioning)
- DNS Records:
- A method to create DNS records for your domain name (e.g. wire.example.com)
- See DNS Requirements for Wire Deployments for the full list of required hostnames and examples.
- SSL/TLS certificates:
- A method to create SSL/TLS certificates for your domain name (to allow connecting via https://)
- To ease out the process of managing certs, we recommend using Let's Encrypt & cert-manager
- Network:
- SSH access to the physical host.
- HTTP/HTTPS and UDP traffic from clients to the cluster, without interference from host-level firewalls (UFW, nftables) on required ports.
- IP forwarding between the host’s network interfaces when following the reference topology. Check Network Traffic Configuration for more details.
- Wire-server-deploy artifact: Access to a
wire-server-deployoffline artifact bundle (contact Wire support for the latest stable artifact). This tarball contains all required Bash scripts, deb packages, Ansible playbooks, Helm charts and container images to perform the installation. See the planning overview for how artifacts are used across WIAB Dev, WIAB Staging and Production.
Note: Check WIAB Dev solution if looking for a lighter weight installation of wire-server, for development uses.
VM Provisioning
Our deployment will be into 7 VMs, shown in the below VM Archetecture and Resource Allocation table, You can choose to use your own hypervisor to manage the VMs or use our Wiab staging ansible provisioning playbook against your physical node to setup the VMs.
VM Architecture and Resource Allocation:
| Hostname | Role | RAM | vCPUs | Disk |
|---|---|---|---|---|
| assethost | Asset/Storage Server | 4 GiB | 2 | 100 GB |
| kubenode1 | Kubernetes Node 1 | 9 GiB | 5 | 150 GB |
| kubenode2 | Kubernetes Node 2 | 9 GiB | 5 | 150 GB |
| kubenode3 | Kubernetes Node 3 | 9 GiB | 5 | 150 GB |
| datanode1 | Data Node 1 | 8 GiB | 4 | 100 GB |
| datanode2 | Data Node 2 | 8 GiB | 4 | 100 GB |
| datanode3 | Data Node 3 | 8 GiB | 4 | 100 GB |
| Total | 55 GiB | 29 | 850 GB |
Note: These specifications are optimized for testing and validation purposes, not for performance benchmarking.
VM Service Distribution:
- kubenodes (kubenode1, kubenode2, kubenode3): Run the Kubernetes cluster and host Wire backend services
- datanodes (datanode1, datanode2, datanode3): Run distributed data services:
- Cassandra
- PostgreSQL
- Elasticsearch
- Minio
- RabbitMQ
- assethost: Hosts static assets like container images and debian binaries to be used by kubenodes and datanodes during installation.
Internet access for VMs:
In most cases, Wire Server components do not require internet access, except in the following situations:
- External email services: If your users’ email providers are hosted on the public internet (for example,
user@gmail.com). If outbound internet access is not allowed and no internal email service is available on your local network, email-based flows such as verification codes, invitations, and some login emails will not be delivered. In that case, you must retrieve the required codes from the logs instead. Read more at I deployed demo-smtp and I want to skip email configuration and retrieve verification codes directly. - Mobile push notifications (FCM/APNS): Required to enable notifications for Android and Apple mobile devices. Wire uses AWS services to relay notifications to Firebase Cloud Messaging (FCM) and Apple Push Notification Service (APNS).
- Third-party content previews: If you want clients to display previews for services such as Giphy, Google, Spotify, or SoundCloud. Wire provides a proxy service for third-party content so clients do not communicate directly with these services, preventing exposure of IP addresses, cookies, or other metadata.
- Federation with other Wire servers: Required if your deployment needs to federate with another Wire server hosted on the public internet.
Note: Internet access is also required by the cert-manager pods (via Let's Encrypt) to issue TLS certificates when manual certificates are not used.
This internet access is temporarily enabled as described in cert-manager behaviour in NAT or bridge environments to allow certificate issuance. Once the certificates are successfully issued by cert-manager, the internet access is removed from the VMs.
Getting the Ansible playbooks
Note: If you prefer to manage VMs yourself with another hypervisor, you can skip this step and instead create the VMs manually with the specs shown above. Along with VM creation, you need to perform a few more steps like downloading the wire-server-deploy artifact and setup network configuration including the firewall rules.
On an admin machine (your workstation or the physical host), obtain the wire-server-deploy repository:
- Download as ZIP:
- Or clone with Git:
You will use the ansible directory from this repository, along with the offline artifact bundle.
WIAB staging ansible playbook overview
The ansible playbook will perform the following operations for you:
System Setup & Networking: - Updates all system packages and installs required tools (git, curl, docker, qemu, libvirt, yq, etc.) - Configures SSH, firewall (nftables), and user permissions (sudo, kvm, docker groups)
wire-server-deploy Artifact & Ubuntu Cloud Image: - Downloads wire-server-deploy static artifact and Ubuntu cloud image using public internet - Extracts artifacts and sets proper file permissions - Note: The wire-server-deploy artifact downloaded corresponds to the currently supported wire-server backend version
Libvirt Network Setup and VM Creation: - Removes default libvirt network and creates custom "wirebox" network - Launches VMs using the offline-vm-setup.sh bash script with KVM - Creates an SSH key directory at /home/ansible_user/wire-server-deploy/ssh for VM access
Ansible Inventory Generation: - Generates inventory.yml with actual VM IPs replacing placeholders - Configures network interface variables for all k8s-nodes and datanodes
Note: Skip the Ansible playbook step if you are managing VMs with your own hypervisor.
Provisioning the VMs with the WIAB Staging playbook
If you want Ansible to create and configure the 7 VMs for you on a single physical host, use the WIAB Staging playbook.
Note: the SSH user for ansible
ansible_usershould have password-lesssudoaccess. The physical host should be running Ubuntu 22.04.
- Prepare an inventory for the physical host, based on ansible/inventory/demo/wiab-staging.yml.
-
Adjust values such as:
-
Physical host address of adminhost eg.
example.comand SSH user eg.demo - Ssh key to access the node
ansible_ssh_private_key_file='~/.ssh/id_ed25519' - Run the provisioning playbook:
Note: Ansible core version 2.16.3 or compatible is required for this step
Getting started with Ansible playbook
Step 1: Obtain the ansible directory
We need the whole ansible directory as ansible-playbook uses some templates for its operations. Choose one method to download the wire-server-deploy/ansible directory:
Option A: Download as ZIP
Option B: Clone with Git
Step 2: Configure your Ansible inventory for your physical machine
A sample inventory is available at ansible/inventory/demo/wiab-staging.yml.
Replace example.com with your physical machine (adminhost) address where KVM is available and adjust other variables like ansible_user and ansible_ssh_private_key_file. The SSH user for ansible ansible_user should have password-less sudo access. The adminhost should be running Ubuntu 22.04. From here on, we would refer the physical machine as adminhost.
The private_deployment variable determines whether the VMs created below will have internet access. When set to true (default value), no internet access is available to VMs. Check Network Traffic Configuration to understand more about it.
Step 3: Run the VM and network provision
Note: Ansible core version 2.16.3 or compatible is required for this step
When VMs are ready
Now you should have 7 VMs running on your adminhost. If you have used the ansible playbook, you should also have a directory /home/ansible_user/wire-server-deploy with all resources required for further deployment. If you didn't use the above playbook, download the wire-server-deploy artifact shared by Wire support and extract it with tar.
Ensure the inventory file ansible/inventory/offline/inventory.yml in the directory /home/ansible_user/wire-server-deploy contains values corresponding to your VMs. If you have already used the Ansible playbook above to set up VMs, this file should have been prepared for you.
The purpose of this secondary Ansible inventory is to interact only with the 7 VMs after they have been created. It is used by the offline deployment steps to install Kubernetes and the stateful services. Our kubernetes solution uses Calico as the default Container Network Interface (CNI) plugin for cluster networking and ensure the kernel requirements are met on the VMs before deploying Kubernetes.
If the provisioning playbook did not generate it for you, create it from the template ansible/inventory/offline/staging.yml:
Then edit ansible/inventory/offline/inventory.yml and replace all placeholder values.
Critical values to review in the inventory:
all.vars.ansible_user: the SSH user present on every VM, should be part ofsudoerslist.all.vars.ansible_ssh_private_key_file: uncomment and set this if you authenticate with a private key, for examplessh/id_ed25519.assethost.hosts.assethost.ansible_host: IP address of the asset host VM.kube-node.hosts.kubenode1|2|3.ansible_host: IP addresses of the three Kubernetes VMs.datanodes.hosts.datanode1|2|3.ansible_host: IP addresses of the three data VMs.cassandra.vars.cassandra_network_interface,elasticsearch.vars.elasticsearch_network_interface,minio.vars.minio_network_interface,rmq-cluster.vars.rabbitmq_network_interface,postgresql.vars.postgresql_network_interface: the network interface name used by those services inside each data VM, for exampleenp1s0. Do not assume this value; verify it on your machines.rmq-cluster.vars.rabbitmq_cluster_master: the RabbitMQ primary node. Keep this aligned with the hostname of one of the data nodes, typicallydatanode1.postgresql.vars.repmgr_node_config: The repmgr config to ensure HA PostgreSQL cluster.
Note: If your environment uses a non-standard MTU (e.g. cloud providers, VPNs, or overlay networks), you must configure the MTU for Calico in
k8s-cluster.vars. Ensure all VMs have the same MTU on their primary interface:Then set: As a rule of thumb: -
calico_mtu = underlying network MTU - encapsulation overhead-calico_veth_mtu≤calico_mtu
Hostnames matter:
- The inventory hostnames
assethost,kubenode1,kubenode2,kubenode3,datanode1,datanode2, anddatanode3should match the actual hostnames configured inside the VMs. - This is especially important for RabbitMQ, because the nodes in
rmq-clustermust match each VM's real hostname. datanode1is also referenced as the Cassandra seed and as the default RabbitMQ cluster master in the template, so change those only if your topology differs.
SSH authentication options:
- If the VMs are reachable with a private key, set
ansible_ssh_private_key_filein the inventory and run Ansible normally. - If you rely on an SSH agent, keep
ansible_ssh_private_key_filecommented out and ensure the agent on theadminhostcan reach all VMs. - If you do not use a private key entry in the inventory and password authentication is enabled on the VMs, add
--ask-passwhen running ansible-playbooks manually and--ask-become-passfor sudo access. - Our installation scripts are non-interactive, define
ansible_passwordandansible_become_passin the inventory instead of relying on interactive password prompts.
Before running the offline deployment scripts, verify that the inventory resolves to the expected machines. The commands below assume you are running them from /home/ansible_user/wire-server-deploy on the adminhost.
If any hostname, IP address, SSH setting, or interface name is wrong at this stage, correct ansible/inventory/offline/inventory.yml before continuing. The next deployment steps assume this inventory is accurate.
For a deeper explanation of offline inventories and VM roles in production-like setups, see Installing kubernetes and databases on VMs with ansible.
Next steps
Once the secondary inventory is ready, please continue with the following steps:
Note: All next steps assume that the wire-server-deploy artifact has been downloaded on the
adminhost(your physical machine) and extracted at/home/ansible_user/wire-server-deploy. All commands from here on will be issued from this directory on theadminhost, ssh on the node before proceeding.
Environment Setup
- Making tooling available in your environment
- Source the
bin/offline-env.shshell script by running following command to set up adalias that runs commands inside a Docker container with all necessary tools for offline deployment. - You can always use this alias
dlater to interact with the ansible playbooks, k8s cluster and the helm charts. - The docker container mounts everything here from the
wire-server-deploydirectory, hence this acts an entry point for all the future interactions with ansible, k8s and helm charts. -
Please ensure that this environment doesn't contain
quay.io/wire/wire-server-deploydocker image from previous installations, if it does then such images need to be removed. -
Generating secrets
- Run
bin/offline-secrets.shto generate fresh secrets for Minio and coturn services. It uses the docker container images shipped inside thewire-server-deploydirectory. - This creates following secret files:
ansible/inventory/group_vars/all/secrets.yamlvalues/wire-server/secrets.yamlvalues/coturn/prod-secrets.example.yaml
Kubernetes and Data Services Deployment
- Deploying Kubernetes and stateful services
- Run the above command to deploy Kubernetes and stateful services (Cassandra, PostgreSQL, Elasticsearch, Minio, RabbitMQ). This script deploys all infrastructure needed for Wire backend operations.
To confirm if the kubernetes cluster has been setup correctly. All pods should be in Running or Completed state. Any CrashLoopBackOff, Error, or Pending states indicate a problem.:
Check Deploying Kubernetes and stateful services for more details into the exact structure of offline-cluster.sh and sub commands.
Helm Operations to install wire services and supporting helm charts
Helm chart deployment (automated): The script bin/helm-operations.sh will deploy the charts for you. It prepares values.yaml/secrets.yaml, customizes them for your domain/IPs, then runs Helm installs/upgrades in the correct order. Prepare the values before running it.
User-provided inputs (set these before running):
TARGET_SYSTEM: your domain (e.g.,wire.example.comorexample.dev) using which you have created subdomains, check more at How to set up DNS records.CERT_MASTER_EMAIL: email used by cert-manager for ACME registration (by default=TRUE).DEPLOY_CALLING_SERVICES: set toTRUEorFALSEto control deployment of the calling services (sftdandcoturn). Default isTRUE.HOST_IP: the IP address on which traffic for Wire calling services is expected to arrive. This should match your public DNS A record since we are expected to deploy Wire and calling services behind a single firewall. The calling traffic configuration described in Network Traffic Configuration and Configure the port redirection in Nftables. It is not required ifDEPLOY_CALLING_SERVICES=FALSE
Calling services behavior:
- When
DEPLOY_CALLING_SERVICES=TRUEandHOST_IPis not passed, the script tries to detect the publicly visible address for this setup by runningwget -qO- https://api.ipify.org. - When
DEPLOY_CALLING_SERVICES=FALSE, the script skips deployment ofsftdandcoturn, and it does not evaluate anyHOST_IP-dependent logic.
TLS / certificate behavior (cert-manager vs. Bring Your Own):
- By default,
bin/helm-operations.shhasDEPLOY_CERT_MANAGER=TRUE, which installs cert-manager and configures a Let’s Encrypt (HTTP-01) issuer for the ingress charts. - If you do not want Let’s Encrypt / cert-manager for TLS certs for the ingress, disable this step by passing the environment variable
DEPLOY_CERT_MANAGER=FALSEwhen runningbin/helm-operations.sh. - When choosing
DEPLOY_CERT_MANAGER=FALSE, ensure your ingress is configured with your own TLS secret(s) as described at Acquiring / Deploying SSL Certificates. Thenginx-ingress-servicesshould be deployed manually. - When choosing
DEPLOY_CERT_MANAGER=TRUE, ensure if further network configuration is required by following cert-manager behaviour in NAT / bridge environments.
To run the automated helm chart deployment with your variables:
If you do not want to deploy the calling services, run:
Charts deployed by the script:
- External datastores and helpers:
cassandra-external,elasticsearch-external,postgresql-external,minio-external,rabbitmq-external,databases-ephemeral,reaper,fake-aws,smtp. - Wire services:
wire-server,webapp,account-pages,team-settings. - Ingress and certificates:
ingress-nginx-controller,cert-manager,nginx-ingress-services. - Calling services:
sftd,coturnwhenDEPLOY_CALLING_SERVICES=TRUE.
Values and secrets generation:
- Creates
values.yamlandsecrets.yamlfromprod-values.example.yamlandprod-secrets.example.yamlfor each chart undervalues/. - Backs up any existing
values.yaml/secrets.yamlbefore replacing them.
Note: The bin/helm-operations.sh script above deploys these charts; you do not need to run the Helm commands manually unless you want to customize or debug.
Manually removing non-required helm charts:
- If some helm charts are not required in your environment like
demo-smtpfor email relaying then use the following command to uninstall them:
Network Traffic Configuration
Bring traffic from the adminhost to Wire services in the k8s cluster
Our Wire services are ready to receive traffic but we must enable network access from the adminhost network interface to the k8s pods running in the virtual network. We can achieve it by setting up nftables rules on the adminhost. When using any other type of firewall tools, please ensure following network configuration is achieved.
Required Network Configuration:
The adminhost must forward traffic from external clients to the Kubernetes cluster running Wire services. This involves:
-
HTTP/HTTPS Traffic (Ingress) - Forward external web traffic to Kubernetes ingress with load balancing across nodes
- Port 80 (TCP, from any external source to adminhost WAN IP) → DNAT to any Kubernetes node on port 31772 → HTTP ingress
- Port 443 (TCP, from any external source to adminhost WAN IP) → DNAT to any Kubernetes node on port 31773 → HTTPS ingress
-
Calling Services Traffic (Coturn/SFT) - Forward TURN control and media traffic to the dedicated calling node
- Port 3478 (TCP/UDP, from any external source to adminhost WAN IP) → DNAT to calling node → TURN control traffic
- Ports 32768-65535 (UDP, from any external source to adminhost WAN IP) → DNAT to calling node → WebRTC media relay
-
Normal Access Rules (Host-Level Access) - Restrict direct access to adminhost
- Port 22 (TCP, from allowed sources to adminhost) → allow → SSH access
- Traffic from loopback and VM bridge interfaces → allow → internal communication
- Any traffic within VM network → allowed → ensures inter-node communication
- All other inbound traffic to adminhost → drop → default deny policy
-
Masquerading (If Internet access for VMs is required) - Enable outbound connectivity for VMs
- Any traffic from VM subnet leaving via WAN interface → SNAT/masquerade → ensures return traffic from internet.
- Controlled by the variable
private_deployment
-
Conditional Rules (cert-manager / HTTP-01 in NAT setups) - Temporary adjustments for certificate validation
- DNAT hairpin traffic (VM → public IP → VM) → may require SNAT/masquerade on VM bridge → ensures return path during HTTP-01 self-checks
- Asymmetric routing scenarios → may require relaxed reverse path filtering → prevents packet drops during validation
flowchart TB

%% External Clients
Client[External Client]
LetsEncrypt["(Optional)<br/>Let's Encrypt"]
Internet["(If Required)<br/>Internet Services<br/>(AWS/FCM/APNS, Email Services etc)"]

%% Admin Host
AdminHost["AdminHost<br/>(Firewall)"]

%% VM Network
subgraph VM_Network ["VM Network (virbr0)"]
    K1[KubeNode1]
    K2[KubeNode2]
    K3["KubeNode3<br/>(CALLING NODE)"]
end

%% Ingress Traffic
Client -->|HTTPS → wire-records.example.com| AdminHost
AdminHost -->|"DNAT →31772/31773"| K1
AdminHost -->|"DNAT →31772/31773"| K2
AdminHost -->|"DNAT →31772/31773"| K3

%% Calling Traffic
Client -->|TCP/UDP Calling| AdminHost
AdminHost -->|DNAT → Calling Node| K3

%% Outbound Traffic (Masquerade)
K1 -.->|SNAT via AdminHost| Internet
K2 -.->|SNAT via AdminHost| Internet
K3 -.->|SNAT via AdminHost| Internet

%% Cert-Manager Flow
K1 <-.->|HTTP-01 self-check| AdminHost
AdminHost-.->|Request TLS certificate| LetsEncrypt
Implementation:
The nftables rules are detailed in wiab_server_nftables.conf.j2. Please ensure no other firewall services like ufw or iptables are configured on the node before continuing.
If you have already used the wiab-staging-provision.yml ansible playbook to create the VMs, then you can apply these rules using the same playbook (with the tag nftables) against your adminhost, by following:
Note: You can use this playbook to change the internet access to VMs by modifying the variable
private_deploymentand re-run the above playbook.
Alternatively, if you have not used the wiab-staging-provision.yml ansible playbook to create the VMs but would like to configure nftables rules, you can invoke the ansible playbook wiab-staging-nftables.yaml against the physical node. The playbook is available in the directory wire-server-deploy/ansible.
The inventory file inventory.yml should define the following variables:
To implement the nftables rules, execute the following command:
cert-manager behaviour in NAT or bridge environments
When cert-manager performs HTTP-01 self-checks inside the cluster, traffic can hairpin:
- Pod → Node → host public IP → DNAT → Node → Ingress
Note: Using Let's Encrypt with
cert-managerrequires internet access (to at leastacme-v02.api.letsencrypt.org) to issue TLS certificates. If you have chosen to keep the network private, that isprivate_deployment=truefor the VMs when applying nftables rules, then you need to make a temporary exception for this traffic. The same outbound access will also be required later for certificate renewals (after 180 days).To temporarily provide outbound internet access from the VMs, add the following nftables masquerading rule on the
adminhost. ReplaceINF_WANwith the WAN interface that should carry this traffic, or make an equivalent change in your firewall:
If you are using a different implementation than nftables then please ensure Internet access to VMs.
In NAT/bridge setups (for example, using virbr0 on the host):
- If nftables DNAT rules exist in
PREROUTINGwithout a matching SNAT onvirbr0 → virbr0, return packets may bypass the host and break conntrack, causing HTTP-01 timeouts and certificate verification failures. - too strict of
rp_filtersettings can drop asymmetric return packets.
Before changing anything, first verify whether certificate issuance is actually failing:
- Check whether certificates are successfully issued:
- Check if k8s pods can access to its own domain:
- If certificates are not in
Ready=Truestate, inspect cert-manager logs for HTTP-01 self-check or timeout errors:
If you observe HTTP-01 challenge timeouts or self-check failures in a NAT/bridge environment, hairpin SNAT and relaxed reverse-path filtering handling may be required. One possible approach is by making following changes to the adminhost:
Note: All
nftandsysctlcommands should run on the adminhost.
-
Relax reverse-path filtering to loose mode to allow asymmetric flows:
These settings help conntrack reverse DNAT correctly and avoid drops during cert-manager’s HTTP-01 challenges in NAT/bridge (virbr0) environments. -
Enable Hairpin SNAT (temporary for cert-manager HTTP-01):
This forces DNATed traffic that hairpins over the bridge to be masqueraded, ensuring return traffic flows back through the host and conntrack can correctly reverse the DNAT.
Verify the rule was added:
- Remove the rule after certificates are issued, confirm by running the following:
Once Let’s Encrypt validation completes and certificates are issued, remove the temporary hairpin SNAT rule. Use the following pipeline to locate the rule handle and delete it safely:
Note: If you added an nftables rule above to allow temporary internet access for the VMs, remove it after certificate issuance is complete.
To remove the nftables masquerading rule for all outgoing traffic run the following command:
If you are using a different implementation than nftables then please ensure temporary Internet access to VMs has been removed.
Note: If email delivery is not working, or if Android/iOS push notifications are still not working after you have configured the required AWS credentials, ensure the required outbound access is allowed as explained at Internet access for VMs.
Next steps and troubleshooting
- To understand individual Helm charts and their configuration options, see Installing wire-server (production) components using Helm.
- For Kubernetes and database Ansible roles, see Installing kubernetes and databases on VMs with ansible.
If something goes wrong:
- Check pod status:
d kubectl get pods -A. - Inspect Helm releases:
d helm list -A. - Review Ansible output for failed tasks.
WIAB Staging is intended to be a safe place to experiment - you can always tear down the VMs and redeploy from scratch once you have corrected your configuration.