Single sign-on and user provisioning
Introduction
This page is intended as a manual for administrator users in need of setting up SSO and provisionning users using SCIM on their installation of Wire.
Historically and by default, Wire’s user authentication method is via phone or password. This has security implications and does not scale.
Solution: SSO with SAML! (Security Assertion Markup Language)
SSO systems allow users to identify on multiple systems (including Wire once configured as such) using a single ID and password.
You can find some of the advantages of SSO over more traditional schemes here.
Also historically, wire has allowed team admins and owners to manage their users in the team management app.
This does not scale as it requires a lot of manual labor for each user.
The solution we offer to solve this issue is implementing SCIM (System for Cross-domain Identity Management)
SCIM is an interface that allows both software (for example Active Directory) and custom scripts to manage Identities (users) in bulk.
This page explains how to set up SCIM and then use it.
Note
Note that it is recommended to use both SSO and SCIM (as opposed to just SSO alone). The reason is if you only use SSO, but do not configure/implement SCIM, you will experience reduced functionality. In particular, without SCIM all Wire users will be named according their e-mail address and won’t have any rich profiles. See below in the SCIM section for a more detailled explanation.
Further reading
If you can’t find the answers to your questions here, we have a few more documents. Some of them are very technical, some may not be up to date any more, and we are planning to move many of them into this page. But for now they may be worth checking out.
Definitions
The following concepts need to be understood to use the present manual:
- SCIM
System for Cross-domain Identity Management (SCIM) is a standard for automating the exchange of user identity information between identity domains, or IT systems.
One example might be that as a company onboards new employees and separates from existing employees, they are added and removed from the company’s electronic employee directory. SCIM could be used to automatically add/delete (or, provision/de-provision) accounts for those users in external systems such as G Suite, Office 365, or Salesforce.com. Then, a new user account would exist in the external systems for each new employee, and the user accounts for former employees might no longer exist in those systems.
See: System for Cross-domain Identity Management at Wikipedia
In the context of Wire, SCIM is the interface offered by the Wire service (in particular the spar service) that allows for single or mass automated addition/removal of user accounts.
- SSO
Single sign-on (SSO) is an authentication scheme that allows a user to log in with a single ID and password to any of several organizationally related, yet independent, software systems.
True single sign-on allows the user to log in once and access different, independent services without re-entering authentication factors.
- SAML
Security Assertion Markup Language (SAML, pronounced SAM-el, /’sæməl/) is an open standard for exchanging authentication and authorization data between parties, in particular, between an identity provider and a service provider. SAML is an XML-based markup language for security assertions (statements that service providers use to make access-control decisions). SAML is also:
A set of XML-based protocol messages
A set of protocol message bindings
A set of profiles (utilizing all of the above)
An important use case that SAML addresses is web-browser single sign-on (SSO) . Single sign-on is relatively easy to accomplish within a security domain (using cookies, for example) but extending SSO across security domains is more difficult and resulted in the proliferation of non-interoperable proprietary technologies. The SAML Web Browser SSO profile was specified and standardized to promote interoperability.
See: SAML at Wikipedia
In the context of Wire, SAML is the standard/protocol used by the Wire services (in particular the spar service) to provide the Single Sign On feature.
- IdP
In the context of Wire, an identity provider (abbreviated IdP) is a service that provides SAML single sign-on (SSO) credentials that give users access to Wire.
- Curl
Curl (pronounced “Curl”) is a command line tool used to download files over the HTTP (web) protocol. For example, curl http://wire.com will download the
wire.comweb page.In this manual, it is used to contact API (Application Programming Interface) endpoints manually, where those endpoints would normally be accessed by code or other software.
This can be used either for illustrative purposes (to “show” how the endpoints can be used) or to allow the manual execution of some simple tasks.
For example (not a real endpoint) curl http://api.wire.com/delete_user/thomas would (schematically) execute the Curl command, which would contact the wire.com API and delete the user named “thomas”.
Running this command in a terminal would cause the Curl command to access this URL, and the API at that URL would execute the requested action.
See: curl at Wikipedia
- Spar
The Wire backend software stack is composed of different services, running as pods in a kubernetes cluster.
One of those pods is the “spar” service. That service/pod is dedicated to the providing SSO (using SAML) and SCIM services. This page is the manual for this service.
In the context of SCIM, Wire’s spar service is the Service Provider that Identity Management Software (for example Azure, Okta, Ping Identity, SailPoint, Technology Nexus, etc.) uses for user account provisioning and deprovisioning.
User login for the first time with SSO
SSO allows users to register and log into Wire with their company credentials that they use on other software in their workplace. No need to remember another password.
When a team is set up on Wire, the administrators can provide users a login code or link that they can use to go straight to their company’s login page.
Here is what this looks from a user’s perspective:
Download Wire.
Select and copy the code that your company gave you / the administrator generated
Open Wire. Wire may detect the code on your clipboard and open a pop-up window with a text field. Wire will automatically put the code into the text field. If so, click Log in and go to step 8.
If no pop-up: click Login on the first screen.
Click Enterprise Login.
A pop-up will appear. In the text field, paste or type the code your company gave you.
Click Log in.
Wire will load your company’s login page: log in with your company credentials.
SAML/SSO
Introduction
SSO (Single Sign-On) is technology allowing users to sign into multiple services with a single identity provider/credential.
SSO is about authentication, not provisioning (create, update, remove user accounts). To learn more about the latter, continue below.
For example, if a company already has SSO setup for some of their services, and they start using Wire, they can use Wire’s SSO support to add Wire to the set of services their users will be able to sign into with their existing SSO credentials.
Here is a blog post we like about how SAML works: https://duo.com/blog/the-beer-drinkers-guide-to-saml
And here is a diagram that explains it in slightly more technical terms:
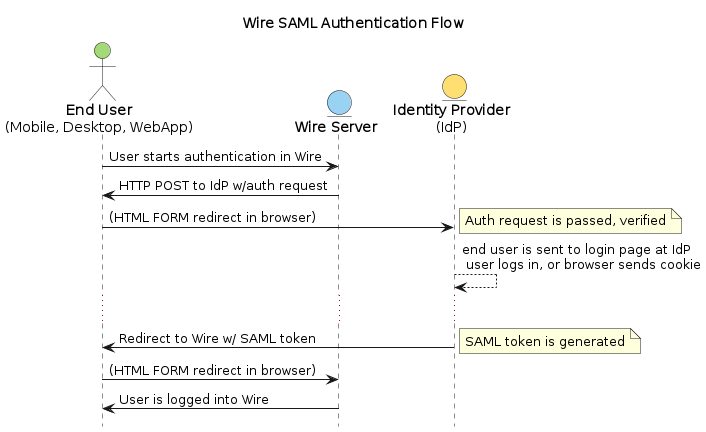
Here is a critique of XML/DSig security (which SAML relies on): https://www.cs.auckland.ac.nz/~pgut001/pubs/xmlsec.txt
Terminology and concepts
Transport: The browser carrries out all the redirections from the SP to the IdP and vice versa.
Service Provider (SP): The entity (here Wire software) that provides its protected resource when an end user tries to access this resource. To accomplish the SAML based SSO authentication, the Service Provider must have the Identity Provider’s metadata.
Identity Provider (IdP): Defines the entity that provides the user identities, including the ability to authenticate a user to get access to a protected resource / application from a Service Provider. To accomplish the SAML based SSO authentication, the IdP must have the Service Provider’s metadata.
SAML Request: This is the authentication request generated by the Service Provider to request an authentication from the Identity Provider for verifying the user’s identity.
SAML Response: The SAML Response contains the cryptographically signed assertion of the authenticated user and is generated by the Identity Provider.
(Definitons adapted from collab.net)
Setting up SSO externally
To set up SSO for a given Wire installation, the Team owner/administrator must enable it.
The first step is to configure the Identity Provider: you’ll need to register Wire as a service provider in your Identity Provider.
We’ve put together guides for registering with different providers:
Instructions for Okta
Instructions for Centrify
Instructions for Azure
Some screenshots for ADFS
Generic instructions (try this if none of the above are applicable)
As you do this, make sure you take note of your IdP metadata, which you will need for the next step.
Once you are finished with registering Wire to your IdP, move on to the next step, setting up SSO internally.
Setting up SSO internally
Now that you’ve registered Wire with your identity provider (IdP), you can enable SSO for your team on Wire.
On Desktop:
Click Settings and click “Manage Team”; or go directly to teams.wire.com, or if you have an on-premise install, go to teams.<your-domain>.com
Login with your account credentials.
Click “Customization”. Here you will see the section for SSO.
Click the blue down arrow.
Click “Add SAML Connection”.
Provide the IdP metadata. To find out more about retrieving this for your provider, see the guides in the “Setting up SSO externally” step just above.
Click “Save”.
Wire will now validate the document to set up the SAML connection.
If the data is valid, you will return to the Settings page.
The page shows the information you need to log in with SSO. Copy the login code or URL and send it to your team members or partners. For more information see: Logging in with SSO.
What to expect after SSO is enabled:
Anyone with a login through your SAML identity provider (IdP) and with access to the Wire app will be able to register and log in to your team using the SSO Login URL and/or Code.
Take care to share the code only with members of your team.
If you haven’t set up SCIM (we recommend you do), your team members can create accounts on Wire using SSO simply by logging in, and will appear on the People tab of the team management page.
If team members already have Wire accounts, use SCIM to associate them with the SAML credentials. If you make a mistake here, you may end up with several accounts for the same person.
User provisioning (SCIM/LDAP)
SCIM/LDAP is about provisioning (create, update, remove user accounts), not authentication. To learn more about the latter, continue above.
Wire supports the SCIM (RFC 7643) protocol to create, update and delete users.
If your user data is stored in an LDAP data source like Active Directory or OpenLDAP, you can use our docker-base ldap-scim-bridge to connect it to wire.
Note that connecting a SCIM client to Wire also disables the functionality to create new users in the SSO login process. This functionality is disabled when a token is created (see below) and re-enabled when all tokens have been deleted.
To set up the connection of your SCIM client (e.g. Azure Active Directory) you need to provide
The URL under which Wire’s SCIM API is hosted:
https://prod-nginz-https.wire.com/scim/v2. If you are hosting your own instance of Wire then the URL ishttps://<hostname>/scim/v2, where<hostname>is where you are serving Wire’s public endpoints. Some SCIM clients append/v2to the URL your provide. If this happens (check the URL mentioned in error messages of your SCIM client) then please provide the URL without the/v2suffix, i.e.https://prod-nginz-https.wire.com/scimorhttps://<hostname>/scim.A secret token which authorizes the use of the SCIM API. Use the wire_scim_token.py script to generate a token. To run the script you need access to an user account with “admin” privileges that can login via email and password. Note that the token is independent from the admin account that created it, i.e. the token remains valid if the admin account gets deleted or changed.
You need to configure your SCIM client to use the following mandatory SCIM attributes:
Set the
userNameattribute to the desired user handle (the handle is shown with an @ prefix in apps). It must be unique accross the entire Wire Cloud (or unique on your own instance), and consist of the charactersa-z0-9_.-(no capital letters).Set the
displayNameattribute to the user’s desired display name, e.g. “Jane Doe”. It must consist of 1-128 unicode characters. It does not need to be unique.The
externalIdattribute:If you are using Wire’s SAML SSO feature then set
externalIdattribute to the same identifier used forNameIDin your SAML configuration.If you are using email/password authentication then set the
externalIdattribute to the user’s email address. The user will receive an invitation email during provisioning. Also note that the account will be set to"active": falseuntil the user has accepted the invitation and activated the account.
You can optionally make use of Wire’s urn:wire:scim:schemas:profile:1.0 extension field to store arbitrary user profile data that is shown in the users profile, e.g. department, role. See docs for details.
SCIM management in Wire (in Team Management)
SCIM security and authentication
Wire uses a very basic variant of oauth, where a bearer token is presented to the server in header with all SCIM requests.
You can create such bearer tokens in team management and copy them from there into your the dashboard of your SCIM data source.
Generating a SCIM token
In order to be able to send SCIM requests to Wire, we first need to generate a SCIM token. This section explains how to do this.
Once the token is generated, it should be noted/remembered, and it will be used in all subsequent SCIM uses/requests to authenticate the request as valid/authenticated.
These are the steps to generate a new SCIM token, which you will need to provide to your identity provider (IdP), along with the target API URL, to enable SCIM provisionning.
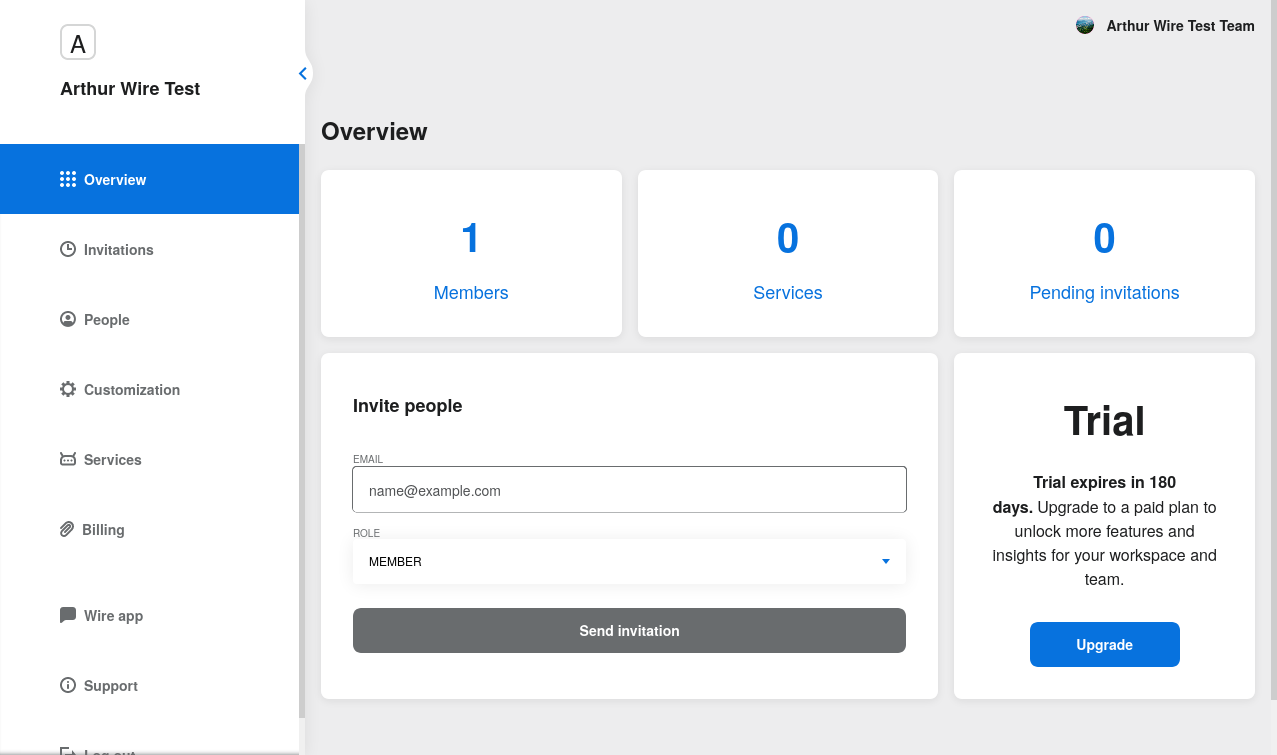
Step 1: Go to https://teams.wire.com/settings (Here replace “wire.com” with your own domain if you have an on-premise installation of Wire).
Step 2: In the left menu, go to “Customization”.
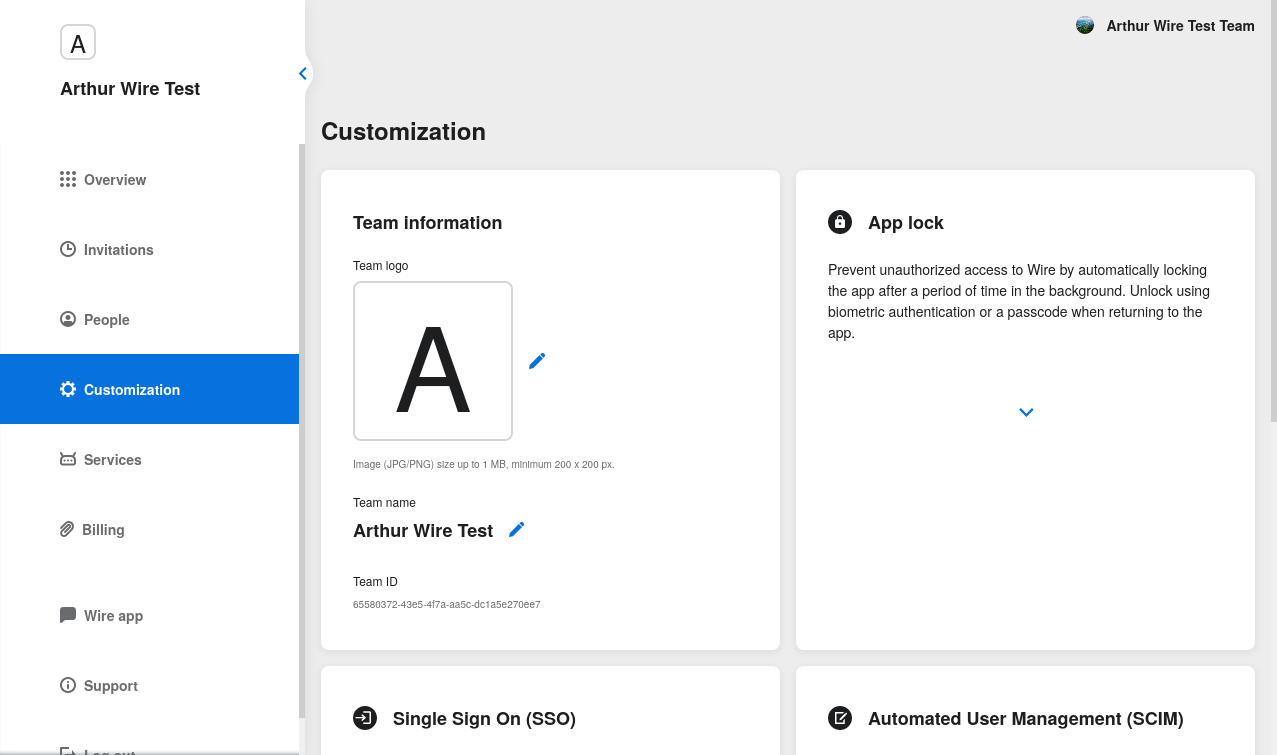
Step 3: Go to “Automated User Management (SCIM)” and click the “down” to expand
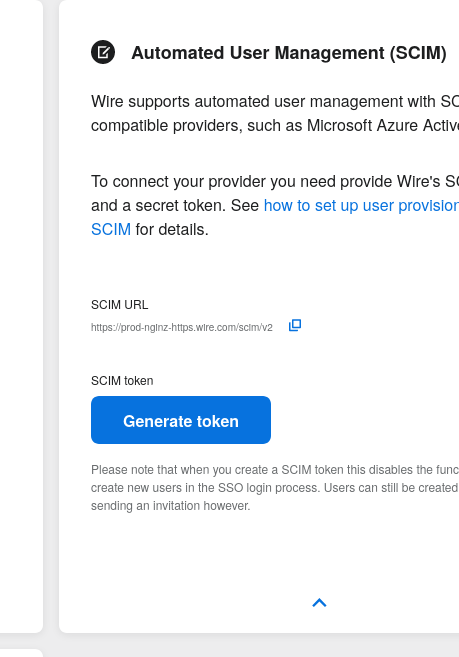
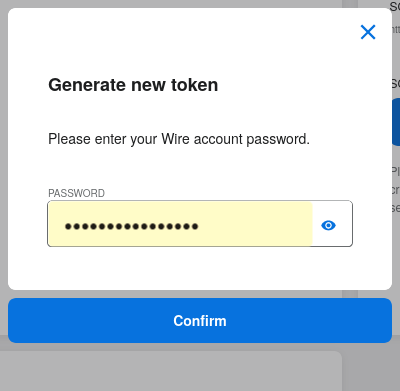
Step 4: Click “Generate token”, if your password is requested, enter it.
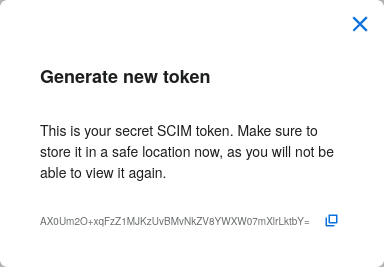
Step 5: Once the token is generated, copy it into your clipboard and store it somewhere safe (eg., in the dashboard of your SCIM data source).
Step 6: You’re done! You can now view token information, delete the token, or create more tokens should you need them.
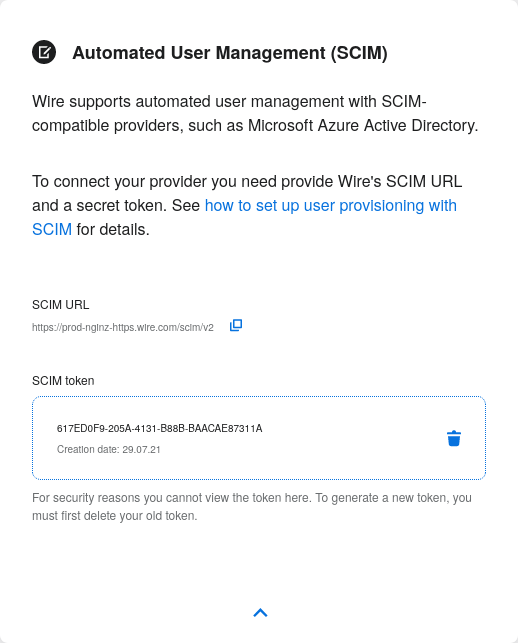
Tokens are now listed in this SCIM-related area of the screen, you can generate up to 8 such tokens.
Using SCIM via Curl
You can use the Curl command line HTTP tool to access the wire backend (in particular the spar service) through the SCIM API.
This can be helpful to write your own tooling to interface with wire.
Creating a SCIM token
Before we can send commands to the SCIM API/Spar service, we need to be authenticated. This is done through the creation of a SCIM token.
First, we need a little shell environment. Run the following in your terminal/shell:
1 export WIRE_BACKEND=https://prod-nginz-https.wire.com
2 export WIRE_ADMIN=...
3 export WIRE_PASSWD=...
Wire’s SCIM API currently supports a variant of HTTP basic auth.
In order to create a token in your team, you need to authenticate using your team admin credentials.
The way this works behind the scenes in your browser or cell phone, and in plain sight if you want to use curl, is you need to get a Wire token.
First install the jq command (https://stedolan.github.io/jq/):
sudo apt install jq
Note
If you don’t want to install jq, you can just call the curl command and copy the access token into the shell variable manually.
Then run:
1export BEARER=$(curl -X POST \
2--header 'Content-Type: application/json' \
3--header 'Accept: application/json' \
4-d '{"email":"'"$WIRE_ADMIN"'","password":"'"$WIRE_PASSWD"'"}' \
5$WIRE_BACKEND/login'?persist=false' | jq -r .access_token)
This token will be good for 15 minutes; after that, just repeat the command above to get a new token.
Note
SCIM requests are authenticated with a SCIM token, see below. SCIM tokens and Wire tokens are different things.
A Wire token is necessary to get a SCIM token. SCIM tokens do not expire, but need to be deleted explicitly.
You can test that you are logged in with the following command:
curl -X GET --header "Authorization: Bearer $BEARER" $WIRE_BACKEND/self
Now you are ready to create a SCIM token:
1export SCIM_TOKEN_FULL=$(curl -X POST \
2--header "Authorization: Bearer $BEARER" \
3--header 'Content-Type: application/json;charset=utf-8' \
4-d '{ "description": "test '"`date`"'", "password": "'"$WIRE_PASSWD"'" }' \
5$WIRE_BACKEND/scim/auth-tokens)
6export SCIM_TOKEN=$(echo $SCIM_TOKEN_FULL | jq -r .token)
7export SCIM_TOKEN_ID=$(echo $SCIM_TOKEN_FULL | jq -r .info.id)
The SCIM token is now contained in the SCIM_TOKEN environment variable.
EXPERT HINT: If you are a site operator and have the ok from the team admin, but not their password, you can try something like this (WARNING! TEST THIS ON NON-PROD ACCOUNTS FIRST!):
export id="$(uuid -v4)"
export token_="$(dd if=/dev/random bs=32 count=1 | base64)"
export created_at='2023-05-30 11:15:00+0000'
export team=...
export descr=...
echo 'INSERT INTO spar.team_provisioning_by_token (token_, team, id, created_at, idp, descr) VALUES ('\'$token_\', $team, $id, \'$created_at\', NULL, \'$descr\'');'
echo 'INSERT INTO spar.team_provisioning_by_team (token_, team, id, created_at, idp, descr) VALUES ('\'$token_\', $team, $id, \'$created_at\', NULL, \'$descr\'');'
echo 'SELECT * FROM spar.team_provisioning_by_team WHERE '"team = $team AND id = $id;"
echo 'SELECT * FROM spar.team_provisioning_by_token WHERE '"token_ = $token_;"
echo 'DELETE FROM spar.team_provisioning_by_team WHERE '"team = $team AND id = $id;"
echo 'DELETE FROM spar.team_provisioning_by_token WHERE '"token_ = $token_;"
You can look it up again with:
1curl -X GET --header "Authorization: Bearer $BEARER" \
2$WIRE_BACKEND/scim/auth-tokens
And you can delete it with:
1curl -X DELETE --header "Authorization: Bearer $BEARER" \
2$WIRE_BACKEND/scim/auth-tokens?id=$SCIM_TOKEN_ID
Using a SCIM token to Create Read Update and Delete (CRUD) users
Now that you have your SCIM token, you can use it to talk to the SCIM API to manipulate (create, read, update, delete) users, either individually or in bulk.
JSON encoding of SCIM Users
In order to manipulate users using commands, you need to specify user data.
A minimal definition of a user is written in JSON format and looks like this:
1{
2   "schemas"     : ["urn:ietf:params:scim:schemas:core:2.0:User"],
3   "externalId"  : "nick@example.com",
4   "userName"    : "nick",
5   "displayName" : "The Nick"
6}
You can store it in a variable using this sort of command:
1export SCIM_USER='{
2   "schemas"     : ["urn:ietf:params:scim:schemas:core:2.0:User"],
3   "externalId"  : "nick@example.com",
4   "userName"    : "nick",
5   "displayName" : "The Nick"
6}'
The externalId is used to construct a SAML identity. Two cases are
currently supported:
externalIdcontains a valid email address. The SAMLNameIDhas the form<NameID Format="urn:oasis:names:tc:SAML:1.1:nameid-format:emailAddress">me@example.com</NameID>.externalIdcontains anything that is not an email address. The SAMLNameIDhas the form<NameID Format="urn:oasis:names:tc:SAML:1.1:nameid-format:unspecified">...</NameID>.
Note
It is important to configure your SAML provider to use nameid-format:emailAddress or nameid-format:unspecified. Other nameid formats are not supported at this moment.
See FAQ
We also support custom fields that are used in rich profiles in this form (see: https://github.com/wireapp/wire-server/blob/develop/docs/reference/user/rich-info.md):
 1 export SCIM_USER='{
 2   "schemas"     : ["urn:ietf:params:scim:schemas:core:2.0:User", "urn:wire:scim:schemas:profile:1.0"],
 3   "externalId"  : "rnick@example.com",
 4   "userName"    : "rnick",
 5   "displayName" : "The Rich Nick",
 6   "urn:wire:scim:schemas:profile:1.0": {
 7      "richInfo": [
 8         {
 9         "type": "Department",
10         "value": "Sales & Marketing"
11         },
12         {
13         "type": "Favorite color",
14         "value": "Blue"
15         }
16      ]
17   }
18 }'
How to create a user
You can create a user using the following command:
1 export STORED_USER=$(curl -X POST \
2  --header "Authorization: Bearer $SCIM_TOKEN" \
3  --header 'Content-Type: application/json;charset=utf-8' \
4  -d "$SCIM_USER" \
5  $WIRE_BACKEND/scim/v2/Users)
6 export STORED_USER_ID=$(echo $STORED_USER | jq -r .id)
Note that $SCIM_USER is in the JSON format and is declared before running this commend as described in the section above.
Get a specific user
1 curl -X GET \
2   --header "Authorization: Bearer $SCIM_TOKEN" \
3   --header 'Content-Type: application/json;charset=utf-8' \
4   $WIRE_BACKEND/scim/v2/Users/$STORED_USER_ID
Search a specific user
SCIM user search is quite flexible. Wire currently only supports lookup by wire handle or email address.
Email address (and/or SAML NameID, if /a):
1 curl -X GET \
2   --header "Authorization: Bearer $SCIM_TOKEN" \
3   --header 'Content-Type: application/json;charset=utf-8' \
4   $WIRE_BACKEND/scim/v2/Users/'?filter=externalId%20eq%20%22me%40example.com%22'
Wire handle: same request, just replace the query part with
'?filter=userName%20eq%20%22me%22'
Update a specific user
For each put request, you need to provide the full json object. All omitted fields will be set to null. (If you do not have an up-to-date user present, just GET one right before the PUT.)
1 export SCIM_USER='{
2   "schemas"     : ["urn:ietf:params:scim:schemas:core:2.0:User"],
3   "externalId"  : "rnick@example.com",
4   "userName"    : "newnick",
5   "displayName" : "The New Nick"
6 }'
1 curl -X PUT \
2  --header "Authorization: Bearer $SCIM_TOKEN" \
3  --header 'Content-Type: application/json;charset=utf-8' \
4  -d "$SCIM_USER" \
5  $WIRE_BACKEND/scim/v2/Users/$STORED_USER_ID
Deactivate user
It is possible to temporarily deactivate an user (and reactivate him later) by setting his active property to true/false without affecting his device history. (active=false changes the wire user status to suspended.)
Delete user
1 curl -X DELETE \
2   --header "Authorization: Bearer $SCIM_TOKEN" \
3   $WIRE_BACKEND/scim/v2/Users/$STORED_USER_ID